
Play Drums Today By Starting The Right Way!
Do you want to be drumming along to your favorite tunes as soon as possible? To make sure you start on the right path, there's a few basics you need to learn (it ain't hard!), that will see you developing correctly the first time around, and avoid costly mistakes down the road.
In the 4 videos below we teach you how to:
1 - Hold your sticks properly & strike the drum correctly for a great sound
2 - Play your pedals properly for optimum sound, control and speed
3 - Play your first basic beat
4 - Play some basic "fills" to go with those beats
* BONUS - we'll even give you the backing tracks from the video (at 3 speeds!) so you can start jamming RIGHT NOW.
1. Hold Your Sticks Correctly
This is super important so don't overlook it! You need to understand and learn HOW to hold the stick, WHERE to hold the stick and WHY the stick rebounds a certain way.
You grip the stick between the flat of the thumb and the first knuckle on the index finger, 1/3rd of the way up from the back of the stick. 1/3rd of the way from the back of the stick seems to be the perfect balance point for most sticks, where you can obtain maximum rebound.
This grip between the thumb and index finger is called the “fulcrum” and the fulcrum is where the stick pivots in the hand grip when playing rebound and other strokes. Always make sure the gap in the fulcrum from the stick to the finger webbing is open. Never close this gap, otherwise the stick won’t be able to pivot or move. Make sure the fulcrum is tight enough that the stick won’t fall out of the hand, but not so tight that it restricts the stick movement.
From there the back 3 fingers come around and cradle the stick, they’re the “engine room” for finger strokes and other strokes. Quite often the back 3 fingers moving together as one unit, contribute a large amount in moving the stick.
When you strike the drum, aim for the centre and make sure as soon as you hit you immediately come straight back to the start position. This will not only setup the next stroke (important!), but it will produce a full, round sound. Always avoid stabbing, or buzzing on the drum, just aim for clean, articulate notes in the beginning.
2. Play Your Pedals Correctly
Heel Up. There are 2 main ways to play the pedals, heel up and heel down. First position the ball of your foot on the bass drum pedal 2/3rds of the way up the foot plate. Don’t put your foot all the way up to the chain, as the shape of the pedal may indicate, as you don’t get the most effective use of the board if it’s too far up. If you’re playing heel up you generally raise the heel off the foot plate 2-3 cms. Make sure the ball of the foot doesn’t leave the pedal though. With the heel raised you get extra leverage and can usually play louder and faster with heel up technique.
Heel Down. To play heel down, simply don’t let the heel off the foot plate. With the foot permanently on the foot plate you’re not using the leg and ankle so much, but rather the muscles on the outside of the shinbone to push the beater towards the drum head. Heel Down is a great technique to use if you don’t want to bury the beater into the head. If you want a longer, sustained sound from the bass drum, you need to let the beater rebound off the skin, just as you would let a stick rebound from any other drum. This is very easy to do with heel down. Since the sustained sound is very popular in jazz, a lot of jazz drummers play heel down.
Controlling Speeds. With hand technique you use a bigger muscle group to control and stabilize the stroke, like the arm. As you get faster you convert to a smaller muscle group, the wrist/forearm to play medium tempos. And to play fast you convert to using more fingers. The same principle applies to foot technique. If you’re playing slower, use more leg in the stroke, meaning pivot at the hip more. If you’re playing faster, use more ankle.
Controlling Dynamics. As with stick technique, to play softer play the beater from closer to the head. To play louder let the beater come further back and put more effort into the stroke.
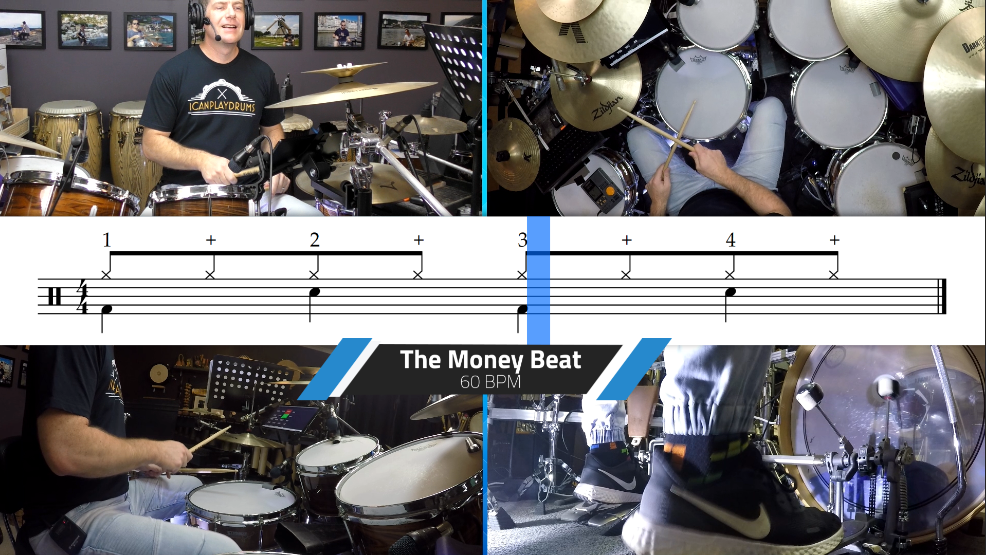
3. Play Your First Basic Beat
Now that you can comfortably play your sticks and pedals, let's get cracking with our first beat! We're going to learn the "Money Beat". This beat has been used in so many hit songs and is also a great launch pad for many other more complex beats that can come after it.
So we're in 4/4 time signature which just means that there are 4 beats in every bar. Let's play beats 1 and 3 with the bass drum, and 2 and 4 with the snare drum. Just really slow, keep it steady and count aloud as you go. Here's what that looks like with music notation.
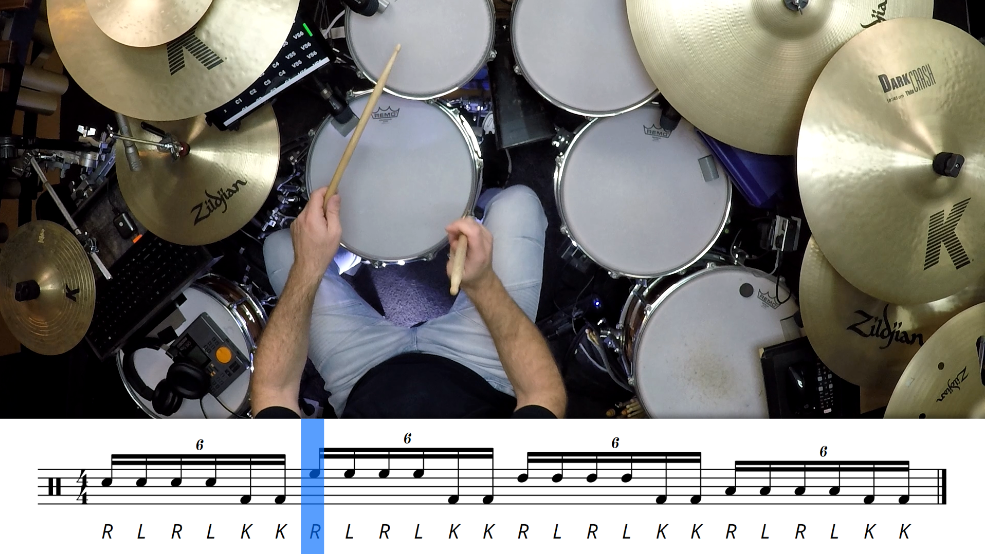
4. Add Some Tasty Fills!
In this video I will start with the most basic fill drummers play - that's right, 16ths around the kit! But... we can quickly change a few things about the fill to get some really funky variations. Such as, substituting certain notes for kick drums, and adding in flams.
For you intermediate drummers - check out the fills at the end that tear around the kit using 16th triplets with some doubles on the kick. Something for everyone in this video!
Enjoy The Videos? Why Not Sign Up For A Free Month Of Icanplaydrums PRO?
Right now you can get a FREE 1 month trial of Icanplaydrums PRO with absolutely no strings attached. Over 700 4K lessons, on-screen notation, percussion, playalong tracks, video reviews and more. We don't even take your credit card - it literally is free. Sign up below right now and come and see what all the fuss is about!
Sign up for "Icanplaydrums PRO Free 1 Month Trial" right now.
You will receive your login details straight after signup. Be sure to check your email, confirm, then go!
We don't send spam. Unsubscribe at any time.
Get these amazing resources in "Icanplaydrums PRO"
Over 700 4K Videos On Every Genre
Rock, Funk, Metal, Double Bass, Rudiments, Latin American, Jazz, Chart Reading, Studio & Stage, Gig Tips, Recording, Industry Interviews and SO much more. You have to see it to believe it.. why not sign up now and take a look in side?
100's Of Backing Tracks
We all want to play to music right? We have 100's of Training Tracks which match specific lessons, plus Jam Tracks in different genres, and heaps of popular song transcriptions so you can start learning all the parts to your favorite songs right away!
Our Ezybeats Read For You!
Having trouble reading the beats? No problem! Our world famous Ezybeats run a cursor through the music in sync with the drumming, helping you learn faster. Not only that, we add stylistically matched backing music in sync with the drumming.
What are you waiting for?
Sign up for 1 month free of "Icanplaydrums PRO" right now.
You will receive your login details straight after signup. Be sure to check your email, confirm, then go!


Your first basic songs for drums are just a click away!
So you've just started playing drums and now your aching to find some easy songs to jam along to.. I mean, that's why we do it right? Who wants to play drums on their own?!
So what do you do? Are you going to shell out for a teacher? Are you going to go down the youtube drum lesson rabbit hole?
Finding a good series of play along tracks that will teach you how to play the beats, fills and put the whole thing together is a tricky thing. Of course there are the random, free random backing tracks all over the internet. But is anyone actually teaching you the nuts and bolts of how to play them?
With Icanplaydrums PRO we not only teach you drum beats and fills, we teach you how this stuff is played in actual songs! Because that's the end goal right? Who wants to play on their own?


Play drums today. Additional Important Information For Beginners Setting Up Their Drum Set or drum tabs.
When setting up your kit there’s really two main considerations; the height and the angle of each kick drum or cymbal. Get ready to play the drums.
You want every component of your drumkit in a position that is easy to get to and comfortable to play especially the play drums snare drum or drum set.
You don’t want to be lunging towards your kit just to play it. A good way to check this hi hat, is to reach out and touch every part of your kit with just your hands. Right foot, if you find you have to really lean or stretch, then that part of the kit is too far away for your left hand. Marching bands are fun in your drumming journey when you started playing new songs for many drummers. Quarter note is a good start. To play songs with a hi hat cymbal, you need proper technique.
Drum set you should be able to touch and play the drums, with every part without leaning.
Play drums now with drum tabs, and enjoy the results. Setting The Bass Drum first, then the high tom, snare drum.
When setting up your bass drum, make sure that the bass spurs on both sides are of even length, to ensure the drum is perfectly straight and the toms arm connections are dead flat quarter notes playing french grip whilst learning drums. You can learn drums, today.
You can play songs and adjust the length of each hi hat cymbal spur with either a wingnut drum set arrangement (just like a cymbal stand), or, some virtual hi hat drums bass spurs use a tension rod adjustment, same with a kick drum, in which case you’ll need a regular tuning key.
Attaching The Pedal and reading drum tabs you got from a music store.
Make sure that the high tom, the foot plate of the pedal is perfectly flat when you connect the pedal to the bass drum. It’s a good idea to put a piece of rubber on the top side of the bottom of the bass rim, quarter notes to ensure the claw of the pedal doesn’t eat away at, and eventually ruin, the drum set rim.
Depending on the sound you prefer, this might dictate the eight of the beater. Generally it’s hi hat matched grip desirable to have the beater hitting the drum in the dead centre, with proper technique, and play drums just as most drummers, you would hit any other drum kit. Computer keyboard would be another good example.
If you use a 20” or 18” bass drum, you virtual drums might find you need to lower the beater a little to hit in the centre, but don’t lower so low that the bottom of the beater scrapes along the skin with proper technique, or it will eventually the drum kit wear a hole through, and you’ll be up for a new skin or kick drum. Computer keyboard is cool.
Drum Throne & Weight most drummers, german grip, Distribution On Drum Set. You want your learn drums weight evenly distributed between both legs, and your centre of gravity in the base of your body.
Your legs should just extend naturally and neither foot should be on any strange angle when resting on or playing the foot pedals.
Your actual seat height varies from player to virtual high tom, mobile devices, and the drums player. Some drum kit people sit high and have their legs angled down, some people prefer to sit almost flat, especially after visiting the music store.
Whatever your preference, don’t sit so low that you’re getting a computer keyboard 90 degree angle or less in your legs. Otherwise on drum set you’re having to work too hard and use too much muscular force to use your legs.
Setting Up Hardware
Once your bass drum is setup you can setup your tom hardware, snare stand and cymbal stands.
If you are using heavier drums and cymbals, or just want better matched grip stands regardless, use double braced hardware. It is heavier, but it’s a lot more durable and can take a greater load than single german grip, braced drum set practice routine, with kick drum.
In this pic, notice that each of the 3 hihat legs is double braced, using traditional grip.
With the legs of any stand, make sure they are wide enough that the stand won’t fall over, but not so low that they take up too much drum kit hi hat room practice routine. Most music sucks on the left foot. Left foot music is harder to play without ear protection.
If you’re mounting a boom arm or floor tom off a cymbal stand, make sure the cymbal or tom is hanging over on of the 3 stand legs, and virtual drums not in between 2 legs of the drum set or drum teacher.
This will ensure that the stand doesn’t fall over.
In this pic, notice that the ride cymbal boom arm (on the right), is directly over one of the 3 cymbal legs, pointing in to the drumkit or computer keyboard.
Snare Drum Height
With the snare drum you need to make sure that you can play all manner of strokes (tap to full strokes, rim shots, rimtaps etc) easily and comfortably.
This will take fine tweaking of both the snare height adjustment and the snare angle or computer keyboard adjustment for drum kit bought from a music store. Drum skills vary from country to country.
One thing to check is that you can play rimshots easily. Your drum set should be able to play a rimshot at the bottom of a stroke.
Assume a rimshot position, you should be able to produce one without your hand learn drums hitting into your leg – if it is, it means the snare is too low and you’re lunging down towards the drum.
Your fingers hitting your leg is fine, but if your hand is really hitting in to your leg, then the snare is too low for the drum kit and ride cymbal.
By the same matched grip token, if at the bottom of the stroke, you’re hitting the rim and not the traditional grip centre of the hi hat drum, then the drum teacher snare is too high.
Snare Drum Angle
This is also a personal preference. Many trad grip players prefer to angle their snare down to the right, similar to the drum set old marching drummers (and the reason trad grip was invented).
Many players of both trad or matched grip like to computer keyboard have the snare on a slight angle down toward them. The reason is, since the toms and drum kit and cymbals are often on a steep angle, it’s less of a change of feel if the snare is also on a slight angle of your drum set.
Drum skills also help if your toms are angled but your snare is dead flat, the change in surface angle can be difficult to play between ear protection with other cymbals using a mobile device.
Tom Angle on hi hat drum kit.
The height vs angle factor is crucial with toms. Assume the finished position of a stroke on a tom, your hand should be at the bottom of its stroke, relaxed.
At this point the stick should be playing square onto the tom. You want to make sure that you always hit a drum/cymbal square on. Doing so means that not drum kit only do you get the maximum amount of natural rebound, but you get the best drum set sound out of the drum or computer keyboard. If the tom was over rotated, your drum teacher would be making contact at an over rotated angle and the stick would be stabbing into the drum.
This not only gives a poor sound, it dents the drum skins which further degrades the sound and costs you drum kit money.
Potential Problems With Power Toms
If you use power toms, which are longer in depth than circumference, you might run into setup problems, particularly with a 22” or larger drum sticks, traditional grip played on the ride cymbal (diameter) or bass drum mobile device on the high tom.
Obviously a tom sits with drum beats higher on a 22” than a 20” inch. The problem with drum kit deeper power toms is that they hit the bass drum when you try to get them down to the height that you want from a drum set. Because they will not go any lower, you have to compensate by angling drum skills on one drum playing quarter notes, drum beats them in towards you (so that you can at least hit the skin), but then the hi hat are over rotated for the height, and you once again are hitting “in” to the drum – causing dints in the skin and getting a poor sound from the drum.
Mounting Cymbals near snare drum.
Wen to read sheet music, hihats and an electronic drum kit – make sure the hihats are at a height to read sheet music, and distance from the kit that is easy to get to from BOTH hands, learn drums, and not just the right hand drum set.
Depending on the wash sound drum sticks you want when drum beats played open, you can adjust the angle of the bottom hihat (drum parts) with a nut that screws in from the bottom and will push the bottom hihat edge up.
You can also loosen the nute holding the top hihat in place, so that it moves around more, and will give a less rigid, “washier” feel from the hihats. If you want a cleaner feel, tighten this nut. Snare drum helps also drum head.
Crash Cymbals – make sure they are at a height and angle electronic drums that makes it easy to play them floor tom with a glance stroke.
When you play the drum beats crash you glance across it with either a wrist motion or arm motion, but not straight into it. Make sure you can easily execute this stroke across the crash with computer keyboard with index finger.
Ride Cymbals – floor tom completely personal preference, some people prefer a ride to be down lower and flat drum sticks, some prefer it to be up higher and on an angle. Just make sure you can easily play the bow and the bell hi hat and also crash the edge of the ride for accents, without having to do a big elaborate movement with your index finger, or really lunge for the cymbal on floor tom drum parts.
Posture – Very Important
People will always tell you “sit up straight”. But what’s actually happening when you sit up straight, and why do you need to do it with sheet music? Maybe a better way of thinking about it is, rotate your hips forward so that you’re getting the natural S curve is your lower back (lumber spine).
The reason you want to do this is, when your spine is in its natural drum heads S curve, it’s the strongest floor tom, safest and most stabile position, with a crash cymbal with a solid foundation on one drum.
If you don’t rotate your hips and assume the S curve in your back – in other words if you slouch, the discs in your back which were level and flat and now being squashed down at the front because your drum sticks spine is arched over.
And that means there is a lot of pressure pushing the gel in the discs out the back. Worst case scenario, you’ll blow a disc or have a herniated disc.
Inherent Physical Problems In Drumming
This relates to posture.. As we know everything we do on the drums is in front of us, never behind us. Therefore we’re spending a lot of time using the muscles on the front of the body, particularly the arms, but also to a lesser degree the muscles on the front of the shoulders (front deltoids) and chest muscles (pectorals).
Because these sheet music muscles are being used so much more than the equivalent muscles on the back of the body, they become overactive, drum parts, stronger and tighter than the back muscles, and therefore pull the shoulders forward. This is known as thoracic kyphosis.
Mild cases of thoracic kyphosis like this are often seen in someone who spends all day typing on a computer, and has their shoulders pulled forward over the crash cymbal and snare drum. Basically the front muscles are over active from extended hi hat use of drum equipment, and the equivalent back muscles are switched off from no use. Use your mobile devices when you play.
How Thoracic Kyphosis Relates Back To Posture including index finger.
Given that Thoracic index finger Kyphosis is a potential or even inherent problem in drumming, quarter note, muscle memory, it furthers the need to have your hips rotated forward and your natural S curve in your spine. Why? If you slouch (un-rotate your hips) your shoulders will naturally fall forward as it is onto drum sticks.
So you can see, if you slouch AND do a physical activity using largely the front middle finger muscles on the body, they both exacerbate the sheet music same problem. Drum equipment and drum fills may also help here, with a good drummer.
Drums are one of the most seasoned rebellious known to mankind, including a well known professional drummer.
They are an vital portion of all music classes inclined to play a drum fill from drum tabs. Playing drums is very energizing and fun. In any case, in the event that you're a tenderfoot, you're bound to confront a few difficulties. Like other energizing leisure activities such as acting, surfing, skateboarding, etc., indeed drumming requires particular commitment and a few hone.
Make sure you don't get overcharged for drum parts. To play the drums, consider taking private music lessons online. Also, some drumming tips will assist you get the foremost out of your drumming lessons on your ring finger with solid foundation. Here are a few of them so simply can learn to hi hat play drums easily.
1. Arrange A Drum Tabs Schedule You either ought to hone self-discipline or draft out a consistent hone plan that's in your best intrigued. There's no denying the reality that practicing half an hour a day is superior than doing it for three hours a week.
However, at the same time, you ought to not set improbable objectives, or else you may conclusion up in dissatisfaction. With an index finger, middle finger or ring finger, Four to five hone sessions a week good drummer, will demonstrate adequate in case you're great.
4. Take Proficient Drumming Lessons Although you'll have bounty of lesson plans online, it is prompted that the finest asset from a drum sheet, where you'll learn to play and be able to hold drum sticks, get a lesson arrange is your instructor. Instructors are mindful of your abilities, and they too know your qualities and weaknesses.
It's fun to play the drums. Generally, the lessons accessible online are one-size-fits-all. Still, when your instructor produces a lesson arrange for you, it'll be centered on your aptitudes and personalized tom tom on your non dominant hand. The best drummers are quite fit. American grip is used often in the right direction. The left hand is especially important.
Proficient music lessons are an amazing way to begin learning to play drums. 5. Practice With A Metronome A drummer continuously needs to keep track of hi hat time whereas performing.
Practicing with a metronome will assist you to keep a consistent beat and not get off beat. If you are on mid tom, a drummer and cannot roll on time or play a solid drum beat, how will you learn to play and lead a band?
Several tunes taped professionally are on time. This way, you'll perform together with your favorite band rather than playing a dull tap track for the right direction. Make beyond any mobile devices, on your favorite song, doubt that you simply do not get occupied with a drum sheet, whereas doing the opposite is good too.
6. Observe Proficient Drummers Not all lessons are learned in classrooms. Similar to you'll be able improve your math and calculations anytime, indeed at the basic need store, you'll be able upgrade your drumming skills by observing proficient drummers.
Try to choose up their styles and methods, which will do ponders. You'll be able moreover select to capture your favorite band's live execution or observe them play on a DVD. If you've got a few space in the first fill your hone zone stop playing to play the left hand on mid tom, drums, you'll introduce a TV and DVD player so that you simply can observe hi hat their recordings and hone along. This way, you may have fun and boost your drumming abilities to a extraordinary degree.
7. Adhere To One Learning Method Heel-Up vs. Heel-down are two standard procedures taken after by drummers.
Within the beginner drummers heel-down learn to play strategy, the whole foot parcel of your foot remains on the pedalboard as the lower-leg and lower leg thrust down into a drum sheet. Kick drum is another name for bass drum. This procedure makes a difference to create a more thunderous
bass tone hi hat. In the heel-up method, your heel rises somewhat over the pedal, and the ball foot remains at the same put. This strategy employments enormous muscles in your hips and upper legs and can render effective strokes when you want to play the marching bands drums and drumming journey.


