
Let's Learn How To Play The Drums!
It's awesome that you're here! Welcome to Icanplaydrums.com - on this page we're going to get you up to speed as quickly as possible, so you can start jamming along to your favorite tunes as soon as possible. Let's dive in!
1. Hold Your Sticks Correctly.
To get started the right way, you're going to need to learn correct technique. Otherwise you're going to have all sorts of problems down the track that you then have to go back and fix. So let's first get you started with holding and moving the sticks correctly, striking the drum properly (no stabbing or buzzing), so you pull a big, clean sound from the drums. Click play below and watch the first video.
2. Play Your Pedals Correctly.
It's important to understand that bass drum technique and hihat technique are not the same thing. Of course there is some cross over and similarities, but you need to be doing different things on either foot. So let's start with your bass drum pedal technique first. NOTE: if you're playing a double pedal, then just copy the same technique from your main pedal to your slave pedal.
BASS DRUM TECHNIQUE: You can play either "heel up" or "heel down", and it can depend on the genre of music that you're playing. I will be demonstrating "heel up" which is the more popular technique used today, you can generally get more speed and power with heel up.
Position the ball of the foot 2/3rds the way up the pedal footboard, not all the way up like the shape of the pedal might indicate. From here you get the best use of the pedal spring, and it should have a nice throw and action.
From here raise your heel off the back of the foot plate a centimetre or two. You can rest the beater on the drum skin at this point. Then to strike the drum, pivot at your hip flexor and sink the entire leg into the stroke. Stick with it and over time you will see you can generate a lot of more volume, power and speed, because you are engaging all the muscles in the upper leg.
If you play heel down, you are no longer pivoting at the hip, which means none of the larger muscles are contributing. Instead you are using only the calf muscle and the anterior fibula (shin bone muscle) to raise and lower the foot.
HIHAT TECHNIQUE:
To begin with, place your foot all the way up the pedal, and put enough pressure through the ball of the foot that the hihats remain closed enough, that when you hit them with a stick you get a nice short, crisp "tick" sound. If you don't press the pedal down, you will get a sustained, washy sound (which sometimes you DO want) but to start with learn to close them properly and get a clean sound.
In the following video I will also be showing you how to play a hihat gliss sound. Check it out.
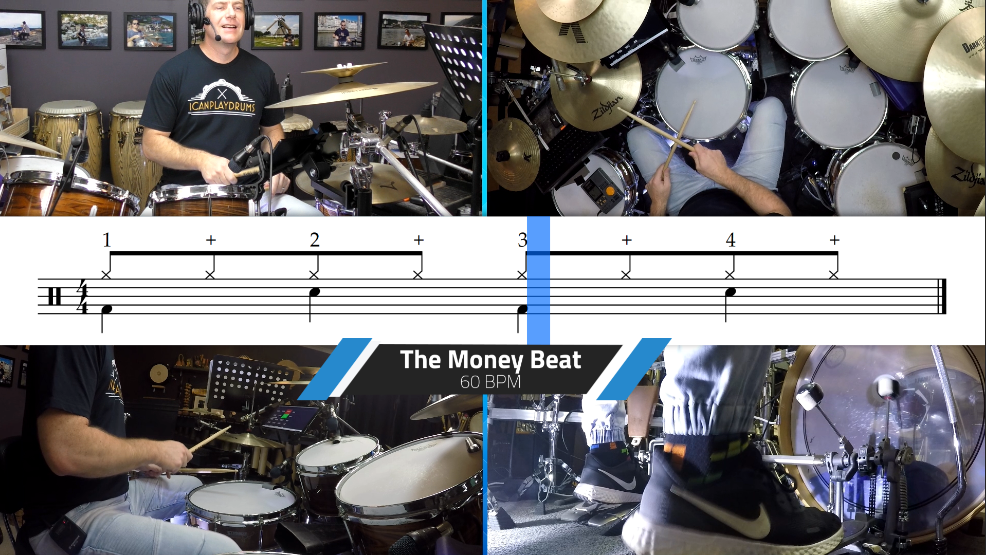
3. Play Your First Basic Beat.
To begin with we're going to get you playing the "Money Beat" (which gets it's name from the fact people have made a lot of money playing it on hit records and live shows). But really, the money beat is just the most basic 8th note beat. The cool thing about this beat is that it also serves as a bit of a launch pad from which you can play more advanced beats, by adding in extra notes on the snare, bass or hihat.
Start by playing 1 and 3 on the kick drum. Count aloud as you play across the bar. Gradually add in 2 and 4 on the snare drum with your left hand. Once you can do that, learn to count 8th notes (which is just the 4 beats in the bar, plus an "and" note in between each beat). 8th notes are twice as fast as the quarter notes you're playing on bass and snare, because there's 8 of them in a bar, rather than 4. Here is what the exercise looks like. Make sure you check out the video below.
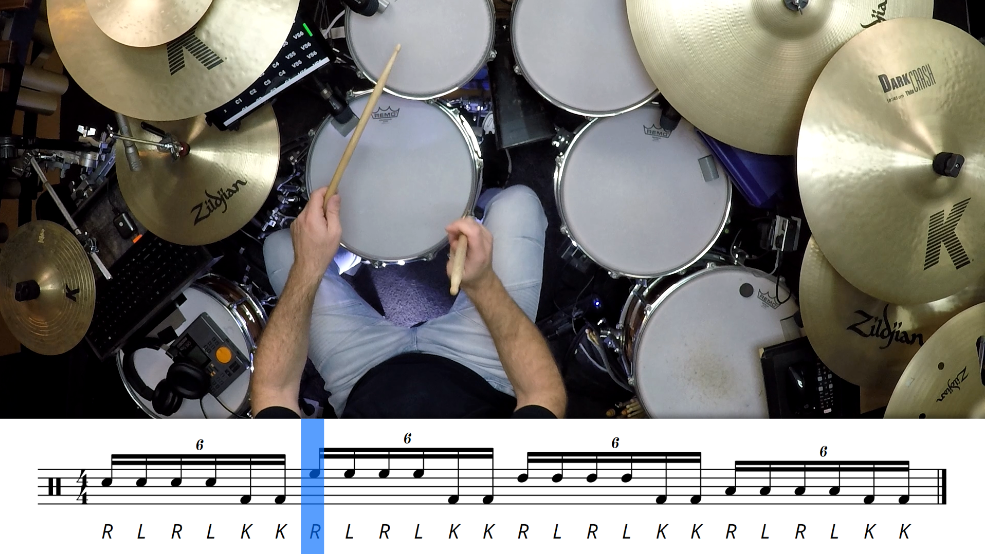
4. Add Some Tasty Fills.
Now that we have a few beats under our belt, let's add some fills to go with them. Fills or "fill ins" are used to signal a new section of music, like going from a verse to a chorus, chorus to a bridge etc. But you can also throw them in here and there to spice things up.
To begin with we will learn a really basic 16th note fill that moves clockwise around the kit. BUT, really quickly we're going to spice up that same fill by substituting certain notes for the bass drum, and also by adding flams.
In the fill at the end of the video below, we dive into a move advanced fill for seasoned players, who want to involve doubles with their bass drum and play in 16th triplets. Enjoy!
Enjoy The Videos? Why Not Sign Up For A Free Month Of Icanplaydrums PRO?
Right now you can get a FREE 1 month trial of Icanplaydrums PRO with absolutely no strings attached. Over 700 4K lessons, on-screen notation, percussion, playalong tracks, video reviews and more. We don't even take your credit card - it literally is free. Sign up below right now and come and see what all the fuss is about!
Sign up for "Icanplaydrums PRO Free 1 Month Trial" right now.
You will receive your login details straight after signup. Be sure to check your email, confirm, then go!
We don't send spam. Unsubscribe at any time.
Get these amazing resources in "Icanplaydrums PRO"
Over 700 4K Videos On Every Genre
Rock, Funk, Metal, Double Bass, Rudiments, Latin American, Jazz, Chart Reading, Studio & Stage, Gig Tips, Recording, Industry Interviews and SO much more. You have to see it to believe it.. why not sign up now and take a look in side?
100's Of Backing Tracks
We all want to play to music right? We have 100's of Training Tracks which match specific lessons, plus Jam Tracks in different genres, and heaps of popular song transcriptions so you can start learning all the parts to your favorite songs right away!
Our Ezybeats Read For You!
Having trouble reading the beats? No problem! Our world famous Ezybeats run a cursor through the music in sync with the drumming, helping you learn faster. Not only that, we add stylistically matched backing music in sync with the drumming.
What are you waiting for?
Sign up for 1 month free of "Icanplaydrums PRO" right now.
You will receive your login details straight after signup. Be sure to check your email, confirm, then go!


How to play the drums today.
DVD 1 - GETTING STARTED
When setting up your kit there’s really two
main considerations;
the height and the angle of each
drum or cymbal. You want every component of your drumkit in a position that is easy to get to
and comfortable to play.
You don’t want to be lunging towards your kit just to play it. A good way
to check this, is to reach out and touch every part of your kit with just your hands. If you find you
have to really lean or drum beat stretch, then that part of the kit is too far away.
drum set You snare drum tabs drum should be able to
touch every part without leaning. drum sticks
Setting The Bass Drum
When setting up your bass drum, make sure that the bass spurs on both sides are
of even
length, to ensure the drum is perfectly straight and the toms arm connections are dead flat.
You
can adjust the length of each spur with either a wingnut arrangement (just like a cymbal stand),
or, some bass spurs use a tension rod adjustment, in which case you’ll need a regular tuning
key.
In this pic, notice that the leg of the spur is adjustable and you can use a spike or rubber..
Attaching The Pedal
Make sure that the foot plate of the pedal is perfectly flat
when drum set you drum tabs connect the pedal to the
bass drum. It’s a good idea to put a piece of rubber on the
top side of drum sticks the bottom
of the bass
rim, to ensure the claw of the pedal doesn’t eat away at, and eventually ruin, the rim.
Depending on the sound
you prefer, this might dictate the eight of the beater. Generally it’s drum beat
desirable to have the beater hitting the drum in the dead centre, just as you would hit any other
drum.
If you use a 20” or 18” bass drum, you might find you need to lower the beater a little to
hit in the centre, but don’t lower so low that the bottom of the beater scrapes along the skin, or it
will eventually wear a hole through, and you’ll be up for a new skin. drum tabs playing drum fills crash cymbal
3
Drum Throne & Weight Distribution drum set
You want your weight evenly distributed between both legs, and your centre of gravity in the
base of your body. drum sticks Your legs should just extend naturally and neither foot should be on any
strange angle middle finger
when resting on or playing the foot pedals.
Your actual seat height varies from player to player.
Some people sit high and have their legs
angled down, some people prefer to sit almost snare drum flat. Whatever your preference, don’t sit so low
that you’re getting a 90 degree angle or less in your legs.
Otherwise you’re having to work too
hard and use too much muscular force to use your legs.
Setting Up Hardware
Once play the drums your bass drum middle finger is setup you can setup your tom hardware, snare stand and cymbal
stands. If you are using heavier drums and cymbals, drum set or just want better stands regardless, use
double braced hardware. It is heavier, but it’s a lot more durable and can take a greater load
than single braced. drum sticks
In this pic, notice that each of the 3 hihat legs is double braced..
With the legs of any stand, make sure they are wide enough that the stand won’t fall over, but
not so low that they take up too much room.
If you’re mounting a boom arm or floor tom off a
cymbal stand, drum beat make sure the cymbal or tom is hanging over on of the 3 stand legs, and not in
between 2 legs. This will ensure that the stand doesn’t fall over. play the drums
4
In this pic, notice that the ride cymbal boom arm (on the right), is directly over one of the 3
cymbal legs, drum set pointing in to the drumkit..
Snare Drum Height
With the snare drum you need to make sure that you can play all manner of strokes snare drum
drum kit (tap to full drum sticks crash cymbal
strokes, rim shots, rimtaps etc) easily and comfortably. This will take fine tweaking of both the
snare height adjustment and the snare angle adjustment.
One thing to check is that you can play rimshots
easily. You should be able to play a rimshot at
the bottom of a stroke. Assume a rimshot position, you should be able to produce one without
your hand hitting into your leg – if it is, it means the snare is too low and you’re lunging down
towards the drum. Your fingers hitting your leg is fine, but if
your hand is really hitting in to your
leg, then the snare is too low.
By the same token, if at the bottom of the stroke, you’re hitting the rim electronic drum set and not the centre of the hold drum sticks
drum, then the snare is too high. drum set drum beat
Snare Drum Angle
This is also a personal preference. Many trad drum sticks grip players prefer to angle their snare down to
the right, similar to the old marching drummers (and the reason trad grip was invented).
Many
players of both trad or
matched grip like to have the snare on a slight angle down toward them.
The reason is, since the toms and
cymbals are often on a steep angle, it’s less play the drums of a change of
feel if the snare is also on a slight angle. If your toms are angled but your snare is dead flat, the
change in surface angle can be difficult to play between.
5
Copyright Rockyhouse electronic drum set Media PTY LTD. All Rights Reserved Worldwide. No Reproduction or Distribution.
In this pic, notice the snare drum has a slight angle towards drum kit me..
Tom Angle
The height vs angle factor
is crucial with toms. Assume the finished position of a drum set stroke on a
tom, your hand should be at the bottom of its stroke, relaxed. At this point the stick should be
playing square onto the tom. You want to make
sure that you always hit a drum/cymbal square
on. Doing so means that not only do you get the maximum amount of natural rebound, but you
get the best sound out of the drum. If the tom play the drums was over rotated, you would be hold drum sticks making contact at
an over rotated angle and the stick would be
stabbing into the drum. electronic drum set This not only gives a poor
sound, it dents the drum skins which further degrades the sound and costs you money.
Potential Problems With Power Toms
If you use power toms, which are longer in depth than circumference, you might run into setup
problems, drum kit particularly with a 22” or larger
(diameter) bass drum.
Obviously snare drum a tom sits drum sticks drum kits hi hat cymbal higher on a 22” than a 20” inch. The problem with deeper power toms is
that they hit the bass drum when you try to get them down
to the height that you basic drum beats want. Because
they will not go any lower, you have to compensate hold drum sticks by angling them in towards you (so that you
can at least hit the skin), play the drums but then they are over rotated for the height, and you once again are
hitting “in” to the drum – causing dints in the skin and getting a poor sound from the drum.
Mounting Cymbals
Hihats – make sure the hihats are at a height, and distance from the kit that is easy to get to
from BOTH hands, and not just the right hand.
Depending drum kit on the wash sound you want when learning drums
played open, you can music store adjust the angle of the bottom hihat with a nut that screws in from the
bottom and will push drum teacher the bottom hihat edge up.
You can also loosen the nute holding the top hihat in place,
so that it moves drum set around more, and
will give a less rigid,
“washier” feel drum sheet music from the hihats. If you want a cleaner feel, tighten this nut.
6
Copyright Rockyhouse Media PTY LTD. All Rights play the drums Reserved Worldwide. No Reproduction or Distribution.
Crash Cymbals – make sure they are at a height and angle that makes it easy to play them practice routine with
a glance stroke. When you play the crash you glance
across it with either a wrist motion or arm
motion, but not straight into it. Make sure you can easily execute this stroke across the crash.
Ride Cymbals – learning drums
completely personal preference, some people prefer a ride to be down lower
and flat, drum teacher
some prefer it to be up higher and on an angle. Just make sure you can easily play the
bow and the bell and also crash the edge of the ride for accents, without having to do a big drum sheet music
elaborate movement or really lunge for the cymbal.
In this pic, notice drum set that all the cymbals are close enough to the throne that
they are easy to get to,
yet not so close that they are covering up the drums and getting in the way..
Posture – Very drum kit Important practice routine
People will always tell you “sit up straight”. But what’s actually happening when you sit up
straight,
and why do you need to do it? Maybe a better way of thinking about it is, rotate your
hips forward so that you’re drum sticks getting the natural S curve is your snare drum lower back (lumber spine). The
reason you want to do index finger
this is, when your spine is in its natural S curve, it’s the strongest, safest
and most stabile position.
If you don’t rotate your hips and assume the S curve in your back – in other words if you slouch,
the discs in your back which were level and flat and now being just the snare drum, kick drum squashed down at the front play the drums
because your spine learning drums left hand drum set is arched over. And that means there is a lot of pressure pushing the gel in
the discs out the back.
Worst case
scenario, you’ll blow a disc or have a herniated disc.
Inherent Physical Problems In Drumming
This relates to posture.. As we know everything we do on floor tom the drums is in front of us, never drum teacher
behind us. Therefore we’re spending a lot of time using the muscles on
the front of the body,
particularly the arms, but also to a lesser degree the muscles on the front of the shoulders (front
deltoids) and chest muscles (pectorals).
7 drum sticks
Copyright Rockyhouse jazz music Media PTY LTD. All Rights Reserved Worldwide. No Reproduction or Distribution.
Because these muscles are being used so much more than the equivalent
muscles on the back left hand
of the body, they become overactive, stronger and tighter than the back
muscles, and drum kit therefore
pull the
shoulders forward. This is known as thoracic kyphosis.
Mild cases of thoracic drum set kyphosis like this are often seen in someone who spends all day typing
on a computer, floor tom and has their shoulders pulled forward. Basically the index finger front muscles are over
active from extended use, and the equivalent back muscles are switched off from no use.
How Thoracic Kyphosis Relates Back To Posture
Given that Thoracic jazz music drum roll right foot
Kyphosis is a potential or even inherent problem in drumming, it furthers the
need to have your kick drum hips rotated forward and your natural S curve in your spine. Why? If you
slouch (un-rotate your hips) your shoulders will naturally fall
forward as it is. left hand So you can see, if
you slouch AND do a physical activity using largely the front muscles on the body, they both
exacerbate the same problem.
1
Copyright 2010 Rockyhouse Media PTY LTD. All Rights Reserved. No Preproduction Or Distribution.
By Jack Bennett – Icanplaydrums.com
DVD 2 – floor tom HAND right foot
TECHNIQUE
2
Copyright 2010 Rockyhouse Media PTY LTD. All Rights Reserved. No Preproduction Or Distribution.
Hand Technique Intro
The first thing to know with “technique” drum sticks is that there are many different hand techniques for
many different applications, and drum kit there isn’t one technique that rules all or one that is better than
the rest. At the end of the day there are many different drum beats ways to move the stick in index finger the hand and drum equipment drum notation
you can use different combinations of fingers, wrist and arm to produce motions in different
ways.
Gripping The Stick
You grip the stick between the flat of the thumb and the first knuckle on the index finger, 1/3rd of
the way up from the back
of the stick. 1/3rd of the kick drum, sheet music left hand
way from the back of the stick seems to be the
perfect balance point for most sticks, where you can obtain maximum rebound.
This grip between the thumb and index finger is called the “fulcrum” and the drum beats fulcrum is where
the stick pivots in the hand grip when playing rebound and other drum kit
strokes. Always make sure the
gap in the fulcrum from the stick to the finger right foot webbing is open. Never close this gap, drum equipment otherwise drum notation
the stick won’t be able to pivot or move.
Make sure the fulcrum is tight enough that the stick won’t fall out of the hand, but not so tight
that it restricts the stick movement.
From there the back 3
fingers come around and
cradle the stick, they’re the “engine room” for left hand
finger strokes and other strokes. Quite often the back 3 fingers moving together as one unit,
contribute a large amount in sheet music moving the stick.
Matched Grip VS Traditional Grip
When both your hands
are in the wrist up position, you’re using Matched Grip. Traditional Grip drum kit
is where the left hand (for a right handed drummer) assumes an underhand position. Here the
back of the left stick sits in the finger webbing drum sticks between the thumb and index finger, and the
middle of the stick rests on the middle joint of the ring finger. The index and middle finger then
come over the top of the stick and work in conjunction with a sideways wrist movement to
produce the motion of the stick.
Traditional grip was invented when marching drummers of the early 20th century played hi hat left hand
marching drums on a 90 degree angle down to the right. It didn’t make sense
to use matched
grip because the left arm had to be raised so high, so a more drum beats
effective under hand grip took
preference. This became known as Traditional Grip right foot. Since so many of the days marching
drummers taught the next generation of drumset players, or were also drumset players
themselves, trad grip became very sheet drum equipment music popular with the jazz drummers and got passed down from
generation to generation through all styles,
including the modern rock styles of today.
You can see the lineage and continuation of trad grip when you study the greats. Early masters
like Gene Krupa and Buddy Rich used trad grip, and modern day masters like Dave Weckl,
Vinnie Colaiuta and Virgil Donati also use trad grip.
3
Copyright 2010
Rockyhouse Media PTY LTD. All Rights Reserved.
No Preproduction drum beats Or Distribution.
The Rebound drum kit
Stroke
The Rebound Stroke gets drum notation its name from the fact that you’re utilizing the natural rebound off the
drum head to produce the sticks up motion. This is a fantastic concept, it hi hat means you’re getting
twice the result from half the effort.. drum sticks hi hat
Assume vertical up position – start position. If you use a combination of fingers and wrist to
throw the stick down into the drum head, then after the stick has made contact, release the
fingers and let the stick rebound up – you’ll notice that it rebounds all the way back to start
position. Repeat this. Here you can see that you
are only sheet music producing the
downward motion, the
reboundstrong_and_bucing the upward motion. right foot Hence you use half the effort for
twice the result.
The rebounds stroke works really well on any surface that offers a drum kit decent amount of drum equipment rebound,
like a snare drum, hihats drum notation or even practice
pad.
Note is these 3 pics, the dingers are controlling the rebound of the stroke..
4
Copyright 2010 drum sticks Rockyhouse Media PTY LTD. All Rights Reserved. No Preproduction Or Distribution.
Wrist Stroke
As fantastic as the rebound stroke is, the truth is that sheet music on a drumkit there are some surfaces that hi hat
don’t offer the same
amount of rebound as a snare or hihats, say for instance a floor drum beats tom with a
slackened skin. When playing surfaces with no rebound you can’t rely on german grip the rebound stroke
alone, you have to learn play drum beats techniques like the wrist stroke where drum kit play drums
YOU produce both the up and
the down motion yourself.
For the wrist stroke, grip the stick tight so that there is no gap between the stick and the hand. drum sticks
drum heads Close the fulcrum (even though i told you not to earlier). This is a training grip hi hat for the wrist
stroke, it helps sheet music you isolate and train just the wrist muscles without letting the fingers help you
along.
Play strokes from vertical position (full strokes)
using only the wrist
motion, with the stick in the
lock grip. Here you are using the muscles on the bottom of the forearm to throw the stick down, german grip
and the muscles on the top of the forearm to pick the stick up.
You will find that as you play around the drumkit you COMBINE techniques
like rebound
and
wrist strokes, depending on what surface you’re playing on. You will later also learn about stick
heights for achieving different volumes, drum heads play drums and arm vs wrist vs fingers for achieving different
speeds. And, drum fills you will later learn more advanced drum sticks techniques like The Moeller Technique and the
Push Pull technique.
5
Copyright 2010 drum beats Rockyhouse Media PTY LTD. All Rights Reserved. No Preproduction Or
Distribution.
In ths pic note the wrist is controlling the entire movement of the stick..
Volumes
A general rule of thumb
with playing different volumes is: if you want to play louder, drop drum music the german grip bass drums
stick from a higher hi hat height, if you want to play softer, drop the stick
from a lower height.
There are well known stick heights like full stroke (stick in vertical position), half stroke playing drums (stick
roughly 6 inches from drumskin), tap stroke (stick roughly an inch from drumskin), taught to
achieve different volumes, but really there are infinite degrees or increments that you can go up play drums sheet music
in.
Try dropping the stick with ½ cm between the
stick and the drum, you’ll see you are producing
an extremely soft sound. Gradually go up in
increments of ½ a cm,
you’ll see that by the time
you get to full stroke you have played maybe 20 or 30 different volumes.
Regardless of what volume you’re trying to play always remember the rule – to play louder drop hi hat
the stick from a higher drum heads height, to play softer playing drums drop the stick from
a lower height.
Control Stroke
Believe it or not you’re
actually playing the Control Stroke in the first half of the rebound stroke.
The Control Stroke is very useful when playing in and out of accents and non accents.
Given that you know to play louder drum beats (ie an accent stroke) you drop the stick from higher, drum fills and to
play softer (non accents) you drop the stick from lower, here is an application of the Control
Stroke.
If you play an accent with one hand and you play drums know that the next stroke for that hand is a soft
note (where you would drop the stick from low), it doesn’t make sense hi hat to let
the stick rebound all matched grip
the way back to start position (vertical),
only to have to bring it back down low, to
get the softer
stroke. Not only would this be a waste of time and motion, but it would actually make playing a
6
Copyright 2010 Rockyhouse Media PTY LTD. All Rights Reserved. No Preproduction Or sheet music Distribution.
soft note harder as you would have too much basic rock beat momentum behind the second stroke to play it
softly.
A much better idea is to not let the stick rebound back, given that you
want it at the low position
for the proceeding soft note. And this is the
Control Stroke.
Just like the rebound matched grip stroke, start from vertical position and throw play drums the stick down. After the
stroke has made contact the fingers should have the stick in a drum fill closed drum heads position. At this point if
you were to release the fingers after the stick had made contact, it would rebound back snare drums hi hat
to the
start position, but if you just leave the fingers in that finished, closed position, the stick won’t
rebound. And hence, it will be in the low position, ready for the next
soft note.
The key with the Control Stroke is not to grip the stick tight at the bottom
of the stroke. Just
simply leave the fingers in closed position and that will be enough.
7
Copyright 2010 traditional grip drum fills Rockyhouse Media ride cymbal PTY matched grip LTD. All Rights Reserved. No Preproduction Or beginner drummers Distribution.
Speeds
To play a slower stroke, use a larger muscle group like the arm (meaning pivot more at the
elbow) to help stabilize
and control the stroke. As you play faster, convert to a smaller muscle drum fill
group like the wrist to play at medium
and medium fast tempos. To play even faster again,
convert to an play drums
even smaller muscle group, the fingers, to play the rapid notes.
There are two main reasons why the fingers can play faster than the wrist, and the wrist can
play faster than the arm.
1) The muscles in the actual fingers are very small, they’re a small muscle mass. Therefore
it’s easier to train the fast twitch muscle fibres in the fingers to be faster. beginner drummers hi hat
2) Look at the distance ride cymbal the stick travels when traditional grip using the fingers compared to the full range of
a wrist stroke or
arm stroke. It’s a smaller distance, therefore it’s easier to play a shorter
distance (range of motion) faster.
HAND GRIPS – German, French, American.
There are 3 main ways of positioning the stick in drum fill
your hand.
Germanic Grip
This is where the back of the stick comes
out the side of the palm. Wrists pointing play drums straight up. practice sessions
So in effect you’re
playing inward. Back in the day it was known as “playing around the
barrel”.
German Grip has a lot of power behind it.
8
Copyright 2010 Rockyhouse Media PTY LTD. All Rights Reserved. No Preproduction Or Distribution.
French Grip drum head
French Grip is
where the wrist rotates outwardly and the thumbs are now up. Here, to get
vertical bounces from the stick the fingers are used
a lot. The hands drum stick come in together, both
thumbs pointing up. French grip is used in a lot of tympani playing, you can get a lot of
subtlety
and speed with French Grip. drum fill
American Grip
People consider American Grip a hybrid or half way
point between German and French grip.
From German hi hat
position, first bring the stick in line down the centre of the palm, instead of across play drums
the palm.
Then outwardly rotate the wrist a fraction. This is American Grip.
American Grip offers the best of everything, you can play all combinations
of fast, slow, loud, ride cymbal
soft but American
Grip also gives you maximum wrist rotation, which you need to play ring finger around
the drumkit. Also, American Grip lets you play finger strokes easily with the NATURAL way that
the fingers want to move (something that is difficult in German position), and because the stick
is down the centre of the palm, it lets you
convert to either German or hi hat
French Grip with minimal
effort. drum head drum beat
9
Copyright 2010 Rockyhouse Media PTY LTD. All Rights play drums Reserved. No drum stick Preproduction Or Distribution.
BASIC STROKES.
Every pattern we ever
play on the drums can be broken down into
combinations of the following
4 rudiments.
Singles
A Single Stroke Roll is where you alternate sticks from R to L repeated.
It doesn’t matter what
technique, volume or speed you use, it simply refers to the sticking pattern which is R, L, R, L
repeated.
Doubles
A Double Stroke Roll is where you
play two strokes per hand change, alternating. So: R, R, L, L
repeated. Again it hi hat doesn’t matter what technique, volume or speed you use, it simply means you
play 2 strokes per hand change.
Flams
A Flam is where you play an accent with a grace note just before it. It gives a slightly
split
sound, like “bda, bda” or “fla, fla”. The grace note is played very close to the accent. ring finger The Flam is
still
considered one note, not two. You can either play flams alternating,
or continuous one hand
lead.
Buzz Roll
The buzz drum head roll is otherwise
known as the multiple hi hat bounce roll
or the press roll. Unlike the single,
double or even triple stroke rolls, the buzz roll has an un
defined number of drum pad strokes per drum tabs hand
change.
Instead of counting or
trying to play a set number of notes, the aim is to buzz
the stick for as
long as possible on the drum head, alternating hands.
Squeeze the stick between the thumb and both the in
dex and middle fingers. You need to find
just the right middle finger amount of squeeze so that from the first bounce from
the last a full, continuous
buzz sound is produced drum tabs. hi hat
